
Introduction
Connecting Preservica to your Identity Provider using SAML is straightforward and can be done using our APIs or the New Generation interface. This guide walks you through using APIs to set it up. If you’d prefer to use the interface, please see our other guide.
If you encounter an issue at any point in this process, please contact support@preservica.com.
There are two key things to know about this single sign-on implementation:
Integrate your IdP’s group or role membership with Preservica roles
Roles within Preservica are controlled by group membership in your IdP so you need to ensure that group membership is being included in the SAML assertion.
Find out more in section 1.1.2.
Dedicated login page for each tenant
At the end of setting up SAML, you will be provided with a unique login URL for your Preservica tenant and you will need to instruct your SAML users to use this URL to log into Preservica. The good news is that they only have to use that URL the first time - when they come back to Preservica within the same browser, they will automatically be redirected, and they will only need to use the unique login URL if they want to switch tenant (if your Preservica edition gives you access to more than one tenancy).
If you want to use the same user to log in to multiple tenancies, create a separate Enterprise Application for each tenancy and assign the appropriate groups to each. Users will need to visit the unique login URL for each tenant when they log in.
How to set up SAML SSO using Preservica APIs
To start using SAML, you need to add an Enterprise Application in your SAML Identity Provider (IdP), and then configure your Preservica tenant to use that Enterprise Application.
Step 1: Add a new Enterprise Application in your SAML IdP
You will need to create a new Enterprise Application in your IdP for each Preservica tenant (if you have multiple tenants in your Preservica instance). Depending on your organization, you may need to ask this of your IT team.
There are two parts to the setup: Authentication and Authorization (i.e. group membership).
1.1 Authentication
To set up an Enterprise Application within your IdP, you will need to provide some information about Preservica’s SAML implementation. Specifically, you will need:
EntityID = ….
Assertion Consumer Service (ACS) URL = …..
If Preservica already provided you with the Entity ID and ACS URL, you can skip to section 1.2.
Otherwise, you can get this information via your browser (where your-preservica-url needs to be replaced by your dedicated Preservica URL):
a. Log onto https://your-preservica-url/auth/login using your current non-SSO account
b. Ignore the redirect and type the following URL in your browser: https://your-preservica-url/auth/saml/sp-metadata
c. This will download onto your computer a saml-sp-metadata.xml file that contains the entityID and the ACS URL (called Location) within the XML (see screenshot below)
d. The last part of the entityID (after /saml/sp-metadata)/ is the Tenant ID. As mentioned earlier, you will get a unique Tenant ID per tenant on your instance (if you have multiple tenants). You will use this Tenant ID to select which tenancy to log into using (for example: https://us.preservica.com/auth/login/4071c5554d12f9a190a966996c3949e8)

1.2 Authorization
When setting up your new Enterprise Application, you need to ensure that the group membership/role information is included in the SAML assertion.
1.3 Have your IdP Metadata URL and IdP Metadata File ready
At the end of the setup, your IdP will provide a Metadata URL (also called App Federation Metadata URL) and/or a Metadata XML file which you will need to complete the setup.
Preservica can provide guides with guidance on how to configure an Azure Enterprise Application or an Okta application on demand (email support@preservica.com) but please note that your own IdP might differ.
Step 2: Configure your Preservica tenant
To configure your tenant to use SAML, you need to use the Auth Management API. You will need to be a manager level user to complete these steps.
You will also need to use a CLI or a tool like Postman to complete these steps, (please note that you cannot use the Preservica’s Swagger UI).
2.1 To get an access token to use with the Preservica APIs:
You need to use the Preservica Authentication API (https://###.preservica.com/api/accesstoken/documentation.html#/) to get an access token.
-
To get an access token, make a POST request to /api/accesstoken/login, with the user name, tenancy and password as form parameters in the content (e.g. username=accessuser&password=secret&tenant=TENANT_ID).
-
If the credentials are correct, you will receive a JSON response similar to the below. A successful token is valid for 15 minutes.
{ "success": true, "user": "access-user", "token": "46e4402d-7309-4bec-a913- e97f9fa386be", "refresh-token": "3b5c4c11-8df9-439c-9a7e-c0875461079b", "validFor": 15}
If two factor authentication is enabled for this tenant, you may receive a failure containing a continuation token, which you should use together with a valid 2FA token with the /api/accesstoken/complete-2fa endpoint.
2.2 To configure your tenant with the Preservica Auth Management API
Please note that you have to request a new authentication token every time you make a PUT request.
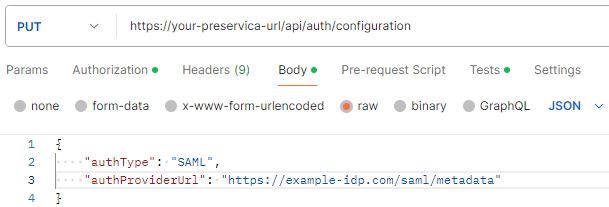
- Make a PUT request to /api/auth/configuration. Set the HTTP header ‘Preservica-Access-Token’ to the access token string acquired in 2.2.1 (or pass it as a Bearer token).
Include the IdP’s Metadata URL as the authProviderUrl.
Do NOT include any attribute or role mappings yet.
The body of the request will thus be of the form:
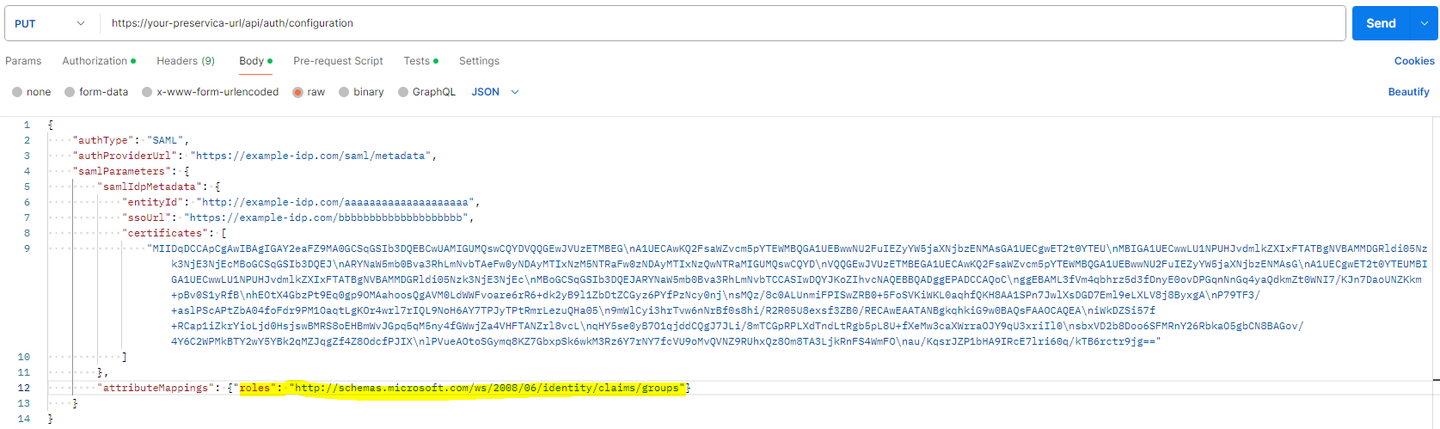
- The successful response will return all the information extracted from the IdP’s metadata and will be of the form

- You then need to set the roles attribute mapping. You can do so by posting back the successful response you got in step 2 and updating the “attributeMappings” field at the end with:
"attributeMappings": {"roles": "your-IdP-role-attribute"} }, "roleMappings" : { "CUSTOM_ROLE_1" : o "ROLE_SDB_MANAGER_USER" ], "CUSTOM_ROLE_2" : M "ROLE_SDB_INGEST_USER", "ROLE_SDB_ACCESS_USER", "ROLE_SDB_DATA_MANAGEMENT_USER", "ROLE_SDB_TRANSFORM_USER"] }
Where “CUSTOM_ROLE_1” etc. need to be replaced with the name of the existing groups in your IdP.
Please note that in IdP such as Azure ID, the value passed by the SAML assertion is not the Group name but the Group Object ID (which is a UUID).
The roles attribute will vary depending on your IdP, but as an example, for Azure AD, it is http://schemas.microsoft.com/ws/2008/06/identity/claims/groups
We recommend that you copy/paste the URL and not attempt to retype it to avoid including whitespaces or replacing http with https.
See the end of this guide for the full list of Preservica’s roles that can be mapped to your IdP.
If you or your IdP require Preservica to send signed SAML requests, please see Appendix 1 below for instructions to set that up.
2.3 Confirm your new SAML works
To confirm your SAML is set up correctly, please follow these steps:
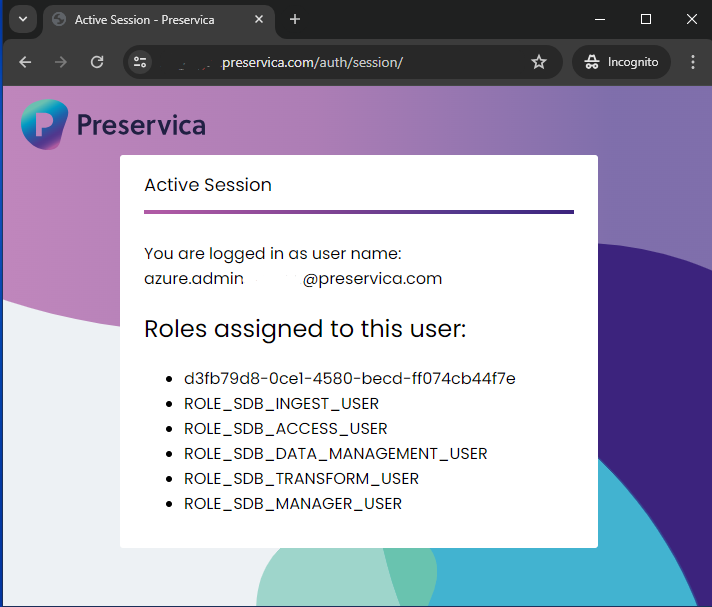
- Log in to https://your-preservica-url/auth/login/tenant_ID (the Tenant ID was mentioned in section 2.1.1) as a manager level user using your IdP credentials.
- Ignore the redirect and type the following URL in your browser: https://your-preservica-url/auth/session
- In the browser, you should be directed to a page like the one below, with your user details and the roles mapped to this user. Please make sure that the “roles” section contains the correct roles.
Step 4: Review your non-SSO accounts
You will still be able to log in with non-SSO accounts directly defined in Preservica’s authentication store as before. Once you are happy that your SAML connection is working properly, you may want to disable or delete most of these.
You should leave a service account for use with the APIs if you want to use them in a non-interactive environment, as SAML relies on the user logging in through the browser, so it isn’t suitable for background API actions. Of course you should keep the credentials for that service user safe, and only give it the roles it needs to do the work you want to use it for. (Do not create a Manager level service account if you do not need to do management actions via API.). The SERVICE role allows you to restrict login ability for any non-SSO accounts which you need to keep to use with APIs.
Depending on the agreement you have with Preservica, we may also create service accounts in your tenancy to help you with support issues or to investigate operational issues. Access to these accounts is tightly controlled, in line with our security requirements.
Appendix 1: Requiring SAML requests from Preservica to be signed
If you require SAML requests from Preservica to be signed, you can follow the instructions below to provide this certificate and configure it using our APIs.
Step 1: Upload certificate
-
Using the POST API endpoint at /api/auth/certificates/ it is now possible to add and store a certificate. The format of the body posted with the request needs to be e.g.:
{
"name" : "signing certificate",
"certificate" : "MIIC3TC...KU=",
"privateKey" : "MIICeAIBA...Yde3"
}
Before submitting this, make sure you are aware of the private key, as by design it will not be retrievable at any point after this. When the endpoint has been used successfully, the response will include the above same 3 parameters, along with a unique id, except that the returned privateKey value will just be “true” to reflect that the private key is stored, but will not expose it. These same details can also be returned by using the equivalent GET /api/auth/certificates/ endpoint.
Step 2: Configure your SAML settings to require the certificate
In order to configure the SAML configuration to require (and use) these signed certificates, amend your auth_configuration via the API endpoint PUT /api/auth/configuration/, in the following way:
-
Within the auth configuration (obtained from GET /api/auth/configuration/ is a section called samlParameters. Within this, a new parameter “signedRequests” can be added - the format of this addition should be:
"signedRequests": { "sign": true, "certificate": <<apiId>> }
-
The above “<<apiID>>” corresponds to the ID of the certificate you wish to use when it is retrieved from the GET /api/auth/certificates/ endpoint.
-
Sending the PUT request to /api/auth/configuration/ with the new signedRequests section will mean that any new authentication request sent to the identity provider will send the stated certificate as part of it.
-
Finally, you or your IT team can then configure your SAML IdP to look for this certificate as proof that the request has come from the trusted Preservica source.
Appendix 2: Preservica roles you can assign via IdP
You can assign any custom or content roles you’ve created yourself.
The full list of Preservica’s functional roles that can be mapped to your IdP are:
ACCESS - This role allows a user to browse and retrieve files and DIPs.
ANONYMOUS - This role is used by the Universal Access application and Portal to control the content and metadata shown to unauthenticated users. It doesn’t have any functional permissions in the application.
DATA MANAGEMENT - This role grants a user access to the data management workflow system in Preservica, which allows a user to re-index, re-characterise, appraise, delete, and generally manage the archive’s content.
INGEST - This role grants a user access to the ingest workflows system in Preservica. This allows them to submit data to the archive.
MANAGER - This grants a user access to the archive administration functionalities of the Preservica application, and full access to the Job Queue and Explorer applications. Caution should be exercised in granting this role. An unwitting or malicious user with manager privileges could cause serious damage to the archive’s data.
TRANSFORM - This grants a user access to the transformation workflows system in Preservica. This allows them to create and schedule format migrations, creating new accessions both for archival and for testing purposes.
Frequently Asked Questions (FAQs) about SSO in Preservica
Q: We are investigating using SSO and we are wondering how this would work for us as our email address currently determines which environment (prod or test) is accessed from the same end point?
A: You'll need to configure the IDP to send users back to a different assertion consumer URL. Normally that would be setting up two different Enterprise apps within the IDP. Your users will then need to access the right login page for the tenant they want to access (prod or test) as per the introduction section of the above guide.
Q: As an on-premise customer, can we still give our users the ADMIN role through this new SSO set-up?
As long as the admin role is specified in your local.properties file (‘authentication.allow.admin.role’), you should then be able to map it to your IdP groups. (The admin role is only available to on-premise customers who need to manage their configuration of Preservica; for cloud customers the highest-privilege role is the Manager role.)
Q: On a user’s ‘Profile’ page, there is a “Change password” button which is available to all users, even those signing in with SSO. What happens if they try to change the password?
A: Users need to have a current password to be able to change it so SSO users won’t be able to use this button. Thank you for the feedback, we will look to remove this button for SSO users in a future version of Preservica.